

RV Winterization
Click Here For A FREE Downloadable PDF Version
Winter can be hard on an RV.
Freezing temperatures can turn a small amount of trapped water into an expensive repair. Water expands when it freezes, and that expansion can crack plumbing, split fittings, damage pumps, rupture filters, and even damage appliances.
The good news?
Proper winterization isn't complicated.
It just needs to be done completely.
This guide walks through the process step by step, including what to do, how to do it, and why you're doing it.
Important: Every RV is different. Your owner's manual should be the final authority for your particular RV, especially for water heaters, furnaces, refrigerators, appliances, and specialized plumbing systems.
Avoiding making mistakes is just step one. If you want a complete, step-by-step roadmap to master your systems and handle roadside repairs without a $150/hr technician fee, grab a copy of ROHRO's RV Repair Today.
👉 Click Here to Download Your Copy Instantly for $9.99 CAD 
Before You Start
There are two main ways to winterize an RV plumbing system:
Method 1: Blow the lines out with compressed air
Water is removed from the plumbing using compressed air.
Method 2: Pump RV plumbing antifreeze through the system
The remaining water is displaced by non-toxic RV plumbing antifreeze.
Some RV owners use one method, while others use a combination of both.
The goal is the same:
Don't leave enough water trapped in a component to freeze and cause damage.
What You'll Need
Depending on your RV and the method you're using, you may need:
- RV/marine plumbing antifreeze
- Fresh-water hose
- Compressed air source
- RV blow-out plug
- Water heater socket/wrench
- Screwdrivers
- Pliers
- Towels or rags
- Bucket or container
- Replacement water filter if necessary
- Your RV owner's manual (if you have it)
- A flashlight (it'll help, trust me)
If using antifreeze, have enough on hand before starting.
Some RVs may only require a couple of gallons, while larger or more complicated systems can require more.
STEP 1: Pick the Right Time
Don't wait until the first hard freeze.
If temperatures are expected to drop below freezing for an extended period, you should already be prepared.
Why?
A single overnight freeze can potentially damage a vulnerable component if water is trapped inside it.
This is particularly important for RVs stored in areas where temperatures can fluctuate above and below freezing.
Best practice: Winterize before the weather becomes consistently cold rather than trying to predict exactly when the first freeze will occur.
STEP 2: Turn Off the Water Heater
Before draining the water heater, turn it off.
If it has been operating, give it enough time to cool completely.
Why?
A water heater contains pressurized hot water.
Opening the system while it is hot or pressurized can result in burns or uncontrolled water discharge.
Don't forget the power source
Depending on your RV, the water heater may have:
- Propane
- 120V electric heating
- Both
Make sure the appropriate heating sources are turned off.
Never assume that because the propane is off, the electric element is also off.
STEP 3: Disconnect the RV From Outside Water
Disconnect your city-water connection.
Turn off the water pump.
Open a faucet briefly to relieve pressure in the plumbing system.
Why?
You don't want the plumbing system pressurized while you're opening drains, removing plugs, or disconnecting components.
Avoiding making mistakes is just step one. If you want a complete, step-by-step roadmap to master your systems and handle roadside repairs without a $150/hr technician fee, grab a copy of ROHRO's RV Repair Today.
👉 Click Here to Download Your Copy Instantly for $9.99 CAD
STEP 4: Drain the Fresh-Water Tank
Open the fresh-water tank drain.
Allow the tank to empty completely.
If your RV has additional low-point drains, open those as well.
Why?
The fresh-water tank contains a large amount of water that doesn't need to remain in the RV during storage.
Draining it also reduces the amount of water that needs to be removed from the plumbing system.
Important: Don't assume that draining the fresh tank drains the entire plumbing system.
It doesn't.
Water can remain in:
- Water lines
- Faucets
- Low points
- Pump components
- Filters
- Shower hoses
- Toilets
- Outdoor showers
- Appliance water lines
That's why winterization continues after the fresh tank is empty.
STEP 5: Drain the Water Heater
Once the water heater is cool and the system is depressurized, drain the water heater according to the manufacturer's instructions.
Depending on the heater, this may involve removing:
- A drain plug
- An anode rod
Also most water heaters also have a pressure-temperature relief valve.
Why?
You don't want a tank full of water sitting inside the RV through freezing temperatures.
It also makes no sense to fill the water heater with several gallons of RV antifreeze.
That's what the water heater bypass is for.
STEP 6: Inspect the Water Heater While It's Empty
Winterization is a great opportunity to inspect your water heater.
Look for:
- Corrosion
- Damaged fittings
- Scale
- Damaged drain plugs
- Problems with the anode rod, where applicable
- Signs of leakage
If your water heater uses an anode rod, inspect it.
Why?
You're already there.
Finding a problem while the RV is sitting in storage is much better than discovering it when you're trying to leave for your first spring camping trip.
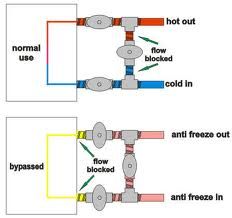
STEP 7: Bypass the Water Heater
This is one of the most important steps if you're using RV antifreeze.
Put the water heater into bypass mode according to your RV's plumbing configuration.
Some RVs have:
- One bypass valve
- Two valves
- Three-valve bypass systems
What does the bypass do?
Instead of sending antifreeze into the water heater, the bypass redirects the antifreeze through the plumbing system.
Why?
A typical RV water heater holds several gallons.
Filling that tank with antifreeze would waste a considerable amount of product.
More importantly, the water heater usually doesn't need antifreeze pumped into it because you've already drained it.
Manufacturer documentation specifically instructs owners to bypass the water heater before pumping RV antifreeze through the plumbing.
Don't guess which way your valves go. They always turn to indicate the direction of water flow.
Avoiding making mistakes is just step one. If you want a complete, step-by-step roadmap to master your systems and handle roadside repairs without a $150/hr technician fee, grab a copy of ROHRO's RV Repair Today.
👉 Click Here to Download Your Copy Instantly for $9.99 CAD
STEP 8: Remove or Bypass Your Water Filter
If your RV has a water filter, remove the filter cartridge before winterization.
Depending on the system, you may need to install a bypass plug or follow the filter manufacturer's procedure.
Why?
Filters can retain water.
That water can freeze and damage the filter housing or cartridge.
You're also better off starting the next camping season with a fresh filter rather than leaving an old filter sitting in storage.
STEP 9: Drain the Low-Point Drains
Open your RV's low-point drains.
These are designed to drain water from the lowest portions of the plumbing system.
Why?
Gravity doesn't always get every drop out of an RV's plumbing.
Low-point drains help remove water that would otherwise remain trapped in low sections of the plumbing.
Best practice: Open faucets while draining so air can enter the system and allow water to escape more easily.
STEP 10: Choose Your Plumbing Method
Now you have two primary options.
Option A: Blow Out the Plumbing
This uses compressed air to push water out of the lines.
How
Connect your compressed-air source to the RV's city-water inlet using an appropriate RV blow-out adapter.
Do not simply connect an unrestricted shop compressor directly to the RV.
Keep the blow-out pressure at or below 30 PSI.
Open one fixture at a time.
Work through:
- Kitchen faucet
- Bathroom sink
- Shower
- Toilet
- Exterior shower
- Other water outlets
- Appliance water lines, if equipped
Run both the hot and cold sides.
Why one fixture at a time?
It concentrates the available air pressure on that section of plumbing.
If you open everything at once, the pressure can be divided among multiple lines.
Important
A single-handle faucet still has separate hot and cold water passages.
Move the handle through both positions.
Option B: Pump RV Antifreeze Through the Plumbing
This is commonly called the "pink stuff" method.
Use only antifreeze specifically intended for RV/marine potable-water systems.
Never use automotive engine coolant in your RV's potable-water plumbing.
Automotive antifreeze can contain ethylene glycol and is not intended for this application.
How it works
Instead of leaving water in the lines, you replace the water with RV plumbing antifreeze.
Most RVs can use a winterization/siphon kit connected near the water pump.
The pump draws antifreeze from a container and sends it through the plumbing system.
Basic process
- Make sure the water heater is bypassed.
- Make sure the fresh tank is isolated from the antifreeze supply.
- Close the low-point drains.
- Place the winterizing tube into a container of RV antifreeze.
- Turn on the water pump.
- Open one faucet.
- Run the cold side until pink antifreeze appears.
- Close it.
- Run the hot side until pink appears.
- Repeat for every fixture.
Avoiding making mistakes is just step one. If you want a complete, step-by-step roadmap to master your systems and handle roadside repairs without a $150/hr technician fee, grab a copy of ROHRO's RV Repair Today.
👉 Click Here to Download Your Copy Instantly for $9.99 CAD
STEP 11: Don't Forget the Toilet
Flush the toilet until RV antifreeze reaches the toilet valve and bowl area.
Leave a small amount in the bowl if recommended by your RV manufacturer.
Why?
The toilet has its own valve and water pathway.
Leaving water trapped in that area can result in freeze damage.
Some manufacturer procedures specifically call for running antifreeze through the toilet and leaving a small amount in the bowl.
STEP 12: Don't Forget the Outside Shower
This is one of the easiest things to forget.
Open both:
- Hot
- Cold
Run them until your chosen winterization method has cleared the water.
Why?
That short piece of exterior plumbing can hold enough water to cause problems.
The same applies to:
- Exterior faucets
- Outdoor kitchens
- Spray ports
- Wash stations
- Other exterior water connections
STEP 13: Don't Forget Appliances
Your RV may have additional water-consuming appliances.
Depending on your RV, check for:
- Ice maker
- Washing machine
- Dishwasher
- Water dispenser
- Filtered drinking-water system
- Coffee system
- Exterior kitchen
- Special shower systems
Why?
Every additional water line is another place where water can remain trapped.
Winterization is only as good as the last water line you remembered.
Avoiding making mistakes is just step one. If you want a complete, step-by-step roadmap to master your systems and handle roadside repairs without a $150/hr technician fee, grab a copy of ROHRO's RV Repair Today.
👉 Click Here to Download Your Copy Instantly for $9.99 CAD
STEP 14: Protect the P-Traps
Even after winterizing the pressurized plumbing, your drains still contain water.
That's where the P-traps come in.
Put a small amount of RV plumbing antifreeze into:
- Kitchen sink
- Bathroom sink
- Shower/tub drain
- Other applicable drains
Why?
The P-trap contains water by design.
That water can freeze.
The antifreeze protects the trap and also helps reduce the possibility of the trap drying out during storage.
STEP 15: Deal With the Holding Tanks
The holding tanks should be emptied before storage.
That includes:
- Black tank
- Gray tank
- Fresh tank
Black tank
Dump it properly and clean it according to your RV's tank-maintenance procedure.
Gray tank
Drain it completely.
Fresh tank
Drain it completely.
Why?
Large amounts of water sitting in tanks aren't doing anything useful during storage.
Also remember that draining a tank doesn't necessarily drain the plumbing connected to it.
STEP 16: Check the Waste Valves
Once everything has been drained, inspect the dump valves.
Look for:
- Leaks
- Damaged handles
- Cracked fittings
- Debris
- Valve problems
If your RV manufacturer recommends leaving certain drains or valves open during storage, follow that procedure.
STEP 17: Don't Stop at Plumbing
Winterizing isn't just about water.
An RV is a collection of systems that can all be affected by long-term storage.
You should also address:
Batteries
Depending on your RV and storage conditions:
- Fully charge batteries.
- Disconnect them if appropriate.
- Maintain them according to battery manufacturer recommendations.
- Check electrolyte levels if applicable.
- Protect terminals from corrosion.
Propane
Have the propane system checked and shut down according to your storage situation and manufacturer recommendations.
Refrigerator
Remove food.
Clean the interior.
Dry it thoroughly.
Leave the doors positioned so air can circulate.
Freezer
Empty and clean it.
Don't leave food inside.
Cabinets
Remove food and anything that could attract rodents or insects.
Why?
A forgotten bag of food can turn your RV into a rodent buffet.
Avoiding making mistakes is just step one. If you want a complete, step-by-step roadmap to master your systems and handle roadside repairs without a $150/hr technician fee, grab a copy of ROHRO's RV Repair Today.
👉 Click Here to Download Your Copy Instantly for $9.99 CAD
STEP 18: Clean the Interior
Give the RV a proper cleaning before closing it up.
Pay particular attention to:
- Food crumbs
- Spills
- Refrigerator
- Stove
- Cabinets
- Floors
- Under furniture
- Storage compartments
Why?
Winter storage is much easier when you're not returning to six months of old crumbs, smells and mystery substances.
STEP 19: Deal With Moisture
This is especially important in damp climates.
Moisture can lead to:
- Mold
- Mildew
- Musty odors
- Wood damage
- Corrosion
- Interior condensation
Make sure the RV is dry before storage.
Ventilation and moisture-control strategies depend heavily on the storage environment.
Important distinction
Winterizing prevents freezing damage.
It does not automatically prevent moisture damage.
You need to address both.
STEP 20: Inspect the Roof and Exterior
Before storing the RV, inspect:
- Roof sealant
- Roof penetrations
- Vents
- Skylights
- Windows
- Doors
- Exterior lights
- Storage compartments
- Awning
- Slide seals
Why?
Winter weather can turn a small seal problem into a major water intrusion problem.
If the roof already has a failed seal, winter is not going to magically fix it.
STEP 21: Check the Tires
Inspect your tires for:
- Proper inflation
- Cracking
- Uneven wear
- Age
- Damage
If the RV is going to sit for an extended period, follow the tire manufacturer's recommendations for storage.
Avoiding making mistakes is just step one. If you want a complete, step-by-step roadmap to master your systems and handle roadside repairs without a $150/hr technician fee, grab a copy of ROHRO's RV Repair Today.
👉 Click Here to Download Your Copy Instantly for $9.99 CAD
STEP 22: Secure the RV Against Rodents
Rodents love RVs.
They're warm, sheltered and full of places to hide.
Inspect potential entry points and deal with them appropriately.
Pay particular attention to:
- Engine compartments
- Plumbing openings
- Utility compartments
- Furnace areas
- Refrigerator access areas
- Gaps around wiring
- Underbody openings
Why?
A mouse doesn't need a large hole to get into an RV.
And once inside, it can damage:
- Wiring
- Insulation
- Upholstery
- Stored belongings
Common Winterization Mistakes
These are some of the problems we see repeatedly.
"I drained the fresh tank, so I'm good."
No.
There can still be water throughout the plumbing system.
"I drained the water heater."
Good.
But did you bypass it?
If you're pumping antifreeze through the system, you don't want to fill the water heater with antifreeze unnecessarily.
"I forgot the outside shower."
Very common.
And very preventable.
"I only opened the cold faucet."
The hot side still contains water.
"I left the water filter installed."
That filter can retain water.
Remove it or follow the filter manufacturer's winterization instructions.
"I used automotive antifreeze."
Don't.
RV potable-water systems require products intended for that application.
"I blew the lines out, so there can't be any water left."
Compressed air removes a lot of water.
It doesn't necessarily guarantee that every pocket, valve, filter, pump or appliance is completely dry.
That's why understanding your specific plumbing system matters.
"I pumped antifreeze in, so I don't have to drain anything."
You still need to drain the system first.
Antifreeze works best when you're replacing residual water rather than simply adding antifreeze to a system full of water.
What Happens When Winterization Goes Wrong?
Freezing water expands.
That expansion can damage components in ways that aren't immediately obvious.
Common examples include:
Cracked water lines
A line may split and not leak until the system is pressurized again.
Broken fittings
Plastic fittings are particularly vulnerable.
Damaged water pumps
Water trapped inside the pump can freeze.
Cracked filter housings
A filter housing can retain water even after the main tank is drained.
Damaged faucets
Water can remain trapped inside faucet bodies and valves.
Damaged toilet valves
Water left around the toilet valve can freeze and cause damage.
Ruined outside showers
Exterior plumbing is particularly easy to overlook.
Appliance damage
Ice makers, washing machines and other water-connected appliances may have their own plumbing that needs attention.
Water heater damage
Improper winterization can cause expensive damage to water-heating equipment.
Avoiding making mistakes is just step one. If you want a complete, step-by-step roadmap to master your systems and handle roadside repairs without a $150/hr technician fee, grab a copy of ROHRO's RV Repair Today.
👉 Click Here to Download Your Copy Instantly for $9.99 CAD
The Most Important Rule
Winterization isn't about doing one big thing.
It's about eliminating or protecting all the places water can remain.
Think of your RV's plumbing as a network.
You aren't finished because the tank is empty.
You aren't finished because the faucets stopped running.
You aren't finished because you saw pink antifreeze.
You're finished when you've accounted for the entire system.
Best Practices
1. Read your owner's manual first
Your RV may have unique plumbing, appliances or winterization procedures. Manufacturer instructions should take priority over generic internet advice.
2. Make a winterization checklist
Don't rely on memory.
Especially if you own a complicated RV.
3. Take pictures of valve positions
Before changing valves, photograph them.
This can save you a lot of frustration in the spring.
4. Label confusing valves
A small label such as NORMAL / WINTER can make future winterization much easier.
5. Do the job slowly
Winterization is not a race.
The extra 15 minutes you spend checking things can save hours of troubleshooting later.
6. Use the right antifreeze
Use RV/marine potable-water-system antifreeze.
Never substitute automotive coolant.
7. Don't use excessive air pressure
Your RV plumbing isn't an air compressor test bench.
Use the pressure specified by your manufacturer.
8. Keep a winterization kit together
Store your:
- Blow-out adapter
- Wrenches
- Water heater socket
- Spare plugs
- Towels
- Antifreeze
- Valve diagram
- Checklist
in one container.
Next year, you'll know exactly where everything is.
Avoiding making mistakes is just step one. If you want a complete, step-by-step roadmap to master your systems and handle roadside repairs without a $150/hr technician fee, grab a copy of ROHRO's RV Repair Today.
👉 Click Here to Download Your Copy Instantly for $9.99 CAD
The ROHRO Winterization Rule
If you remember nothing else, remember this:
Drain it.
Bypass it.
Blow it out or protect it with RV antifreeze.
Check every water outlet.
Check every appliance.
Protect every trap.
Then check it again.
Winterization isn't difficult.
Incomplete winterization is.
And the cost of doing it properly is usually a lot less than the cost of repairing a plumbing system that froze.
One Last Thing: Winterizing Doesn't Mean You're Done With the RV
If you're storing your RV for several months, it's worth checking on it periodically.
Look for:
- Water intrusion
- Roof problems
- Rodent activity
- Battery condition
- Tire condition
- Moisture
- Storm damage
- Unusual odors
When spring arrives, don't simply turn the water on and start camping.
De-winterize methodically.
Flush the plumbing, inspect for leaks, sanitize the fresh-water system when appropriate, return the water heater to normal operation, reinstall filters, and test every water outlet before heading out.
That's the difference between winterizing an RV and actually preparing an RV for winter.
Avoiding making mistakes is just step one. If you want a complete, step-by-step roadmap to master your systems and handle roadside repairs without a $150/hr technician fee, grab a copy of ROHRO's RV Repair Today.
👉 Click Here to Download Your Copy Instantly for $9.99 CAD
This article was written in co-operation between RV Owners Helping RV Owners (ROHRO) and DM Tech RV Education.
DIY RV repairs aren't always the answer, but the more you know, the more money you can save! 👍
Would you like more education?
- We have our💻🎓🌐 ROHRO's The RV Blueprint Online Course🧑🏫
- Different 📚Offline Resources📚
- We also offer our free 📖RV Life Guides📖
We have something for all types of RVer's!
Visit us at🧑🤝🧑 The Official ROHRO Website ❓or just click the 🏠homepage in the menu up top!