

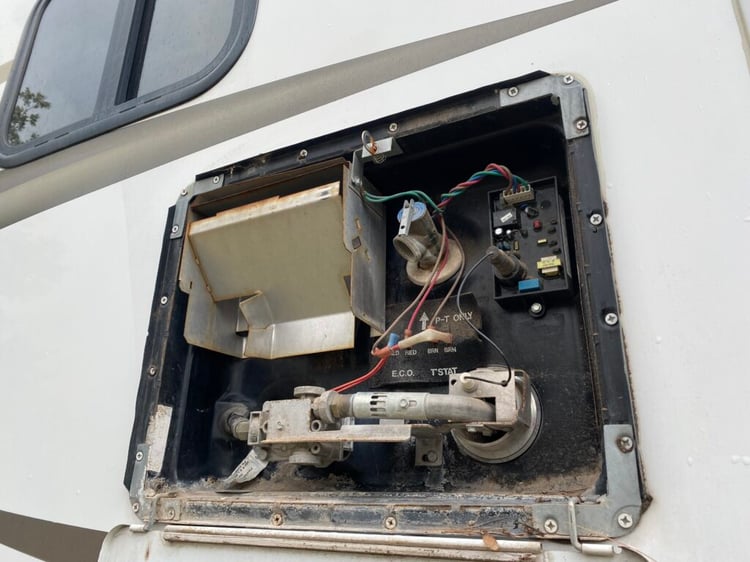
When it comes to enjoying modern comforts on the road, hot water is a game-changer. Your RV's hot water tank (HWT) is the unsung hero providing warm showers, clean dishes, and more. Here’s an in-depth look at how your RV’s HWT works, the pros and cons of upgrading to a tankless water heater, and some maintenance tips to keep your system in top shape.
How an RV Hot Water Tank Works
Most RVs are equipped with a traditional tank-style water heater that holds 6-10 gallons of water. These tanks typically heat water using one or more of the following:
- Propane: Great for off-grid use.
- Electricity: Perfect when connected to shore power.
- Both: Heats the water up faster
Tankless Water Heater: The Modern Upgrade
Tankless water heaters, or on-demand systems, heat water as it flows through the unit. Instead of storing hot water, they use high-powered burners or heating elements to heat water instantly.
Pros of Tankless Water Heaters
- Endless Hot Water: Perfect for larger families or long showers.
- Energy Efficiency: Only heats water when needed, saving propane or electricity.
- Compact Design: Frees up valuable RV storage space.
- Lightweight: Ideal for RVs where weight is a concern.
Cons of Tankless Water Heaters
- Higher Initial Cost: More expensive than traditional tanks.
- Water Pressure Sensitivity: May struggle in areas with low water pressure.
- Power Needs: Requires significant propane or electric power to operate.
- Complexity: May need professional installation and more frequent maintenance.
Maintenance Tips for Tank-Style and Tankless Water Heaters
Flush Regularly to Remove Sediment:
- Sediment can accumulate at the bottom of a tank, reducing efficiency and causing corrosion.
- Flush the tank at least once a year with fresh water.
Inspect and Replace Anode Rods (Tank-Style Only):
- The anode rod prevents rust by sacrificing itself. Replace it every 1-2 years or when visibly degraded.
Check Heating Elements (Electric Models):
- Faulty elements can cause uneven heating or total failure. Test with a multimeter and replace if needed.
Winterize Properly:
- Drain the HWT and Bypass it when adding antifreeze to your RV’s water lines during winter storage.
Preventing the Rotten Egg Smell in Your Hot Water
The foul odor in your hot water typically comes from bacteria in your tank and heating the water up and letting it sit in your tank triggers it.
Steps to Prevent and Eliminate the Odor:
- Flush the Tank: With water or use a vinegar solution to clean and disinfect the tank.
- Use a Water Filtration System: Filter out impurities before they enter your tank.
Bypassing Your Tank (For winterizing or maintenance)
Tools and Supplies Needed
- RV water heater bypass kit (if not pre-installed).
- Freshwater hose (for flushing or draining).
- Water heater wrench ( typically a 7/8th socket for a 1/2 inch plug if its plastic for draining the tank).
Steps to Bypass Your RV Hot Water Tank
Turn Off Water and Power
- Ensure your RV water pump is off.
- Disconnect the RV from the city water supply.
- If your water heater runs on propane or electricity, turn off the propane and switch off the breaker.
Relieve Pressure in the System
- Pull the pressure relief valve, let any pressure that may be in the tank squirt out.
Drain the Hot Water Tank
- Locate the drain plug (or anode rod) on the outside of the water heater.
- Use a wrench to remove the plug and let the water drain completely.
Access the Water Heater Bypass Valves
- Find the back of the water heater inside the RV (usually behind a panel).
- Remove the panel with a screwdriver if necessary.
Adjust the Valves
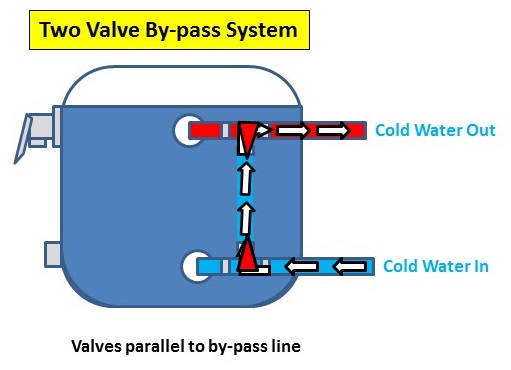
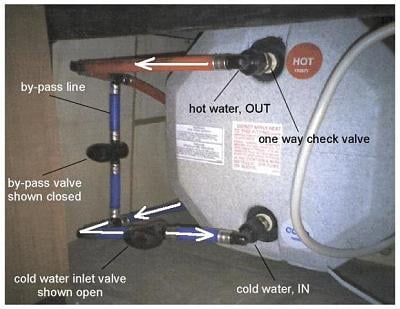
Locate the bypass system, which typically has three valves:
- Cold Water Inlet Valve (bottom).
- Hot Water Outlet Valve (top).
- Bypass Valve (middle).
Adjust the valves as follows:
- Close the inlet and outlet valves to stop water from entering or exiting the tank.
- Open the bypass valve to allow water to flow around the tank.
(This one is Bypassed - The valves typically face in the direction of the water flow)
Test the Bypass
- Turn on your water pump or connect to city water briefly.
- Open faucets to ensure water flows without filling the water heater.
Finish Up
- Close any open faucets.
- Replace the access panel if it was removed.
(3 Valve bypass system Not Bypassed)
Steps To Turn Your Bypass Off
The steps to turn it off bypass in the spring are simple.
- Screw the drain plug back in, or new anode rod if needed. (Put new Teflon tape on it)
- Turn your water pump on, or if you're on city water you shouldn't need to.
- Turn those valves (on the back of the H.W.T.) so the water can flow into the tank. (It starts filling)
- When it stops, pull the pressure relief valve a few times to get the air out of the tank.
- Go turn a hot and a cold tap till it stops spurting air and has a nice flow of water.
Some Tips
- Label Your Valves: If your bypass system isn’t labeled, consider labeling the valves for future use.
- Check Your Manual: Refer to your RV’s manual for specific instructions based on your make and model.
- Consider an Upgrade: If your RV doesn’t have a bypass system, consider installing a bypass kit for easier winterization.
RV Hot Water Tank Troubleshooting Guide
(This is not an all encompassing list, it's a list of the common problems and causes)
1. No Hot Water
Possible Causes:
- Water heater is off or not getting power (electric/gas).
- Blown fuse or tripped breaker.
- Empty propane tank (for gas heaters).
- Pilot light out or igniter not sparking.
- Faulty thermostat or heating element.
Possible Solutions:
- Check that the water heater switch is ON (both inside and outside).
- Inspect circuit breaker/fuses and reset or replace as needed.
- Ensure propane tank is full and valve is open.
- For gas: Try reigniting the pilot light; listen for ignition clicks.
- Test heating element or thermostat with a multimeter; replace if defective.
2. Water Not Hot Enough
Possible Causes:
- Thermostat set too low or malfunctioning.
- Sediment buildup inside the tank.
- Mixing valve blending too much cold water.
- Running too many fixtures at once.
Possible Solutions:
- Adjust thermostat (typically 120°F to 140°F is ideal).
- Flush the tank to remove mineral deposits.
- Check and adjust mixing valve if present.
- Limit simultaneous hot water use.
3. Water Too Hot
Possible Causes:
- Thermostat stuck or faulty.
- High-limit switch (ECO) not functioning.
- Wiring issues causing constant heating.
Possible Solutions:
- Test and replace thermostat.
- Reset or replace ECO/high-limit switch.
- Inspect wiring for shorts or improper connections.
4. Water Heater Leaking
Possible Causes:
- Loose fittings or connections.
- Cracked tank from freezing.
- Faulty pressure relief valve (PRV).
- Worn-out anode rod or gasket.
Possible Solutions:
- Tighten all connections.
- Replace damaged PRV or gasket.
- Replace anode rod if deteriorated.
- If the tank itself is cracked, replacement is necessary.
5. Water Smells Like Rotten Eggs
Possible Causes:
- Bacteria reacting with the anode rod.
- Stale water in the tank.
Possible Solutions:
- Flush the tank thoroughly.
- Replace magnesium anode rod with an aluminum/zinc rod.
- Sanitize the system with bleach solution.
6. Water Heater Won’t Stay Lit (Gas)
Possible Causes:
- Dirty burner or orifice.
- Faulty thermocouple.
- Low propane pressure.
- Bad control board.
Possible Solutions:
- Clean burner tube and orifice with compressed air.
- Replace thermocouple if weak.
- Check propane regulator and lines.
- Test control board and replace if faulty.
7. Popping or Rumbling Sounds
Possible Causes:
- Sediment buildup causing water to boil unevenly.
- Air pockets inside the tank.
Possible Solutions:
- Flush the tank to remove sediment.
- Ensure proper bleeding of air from the system after filling.
8. Electric Water Heater Trips Breaker
Possible Causes:
- Shorted heating element.
- Damaged wiring or loose connections.
- Faulty thermostat.
Possible Solutions:
- Test heating element for continuity and replace if shorted.
- Inspect wiring and tighten/replace as needed.
- Replace thermostat if defective.
🔍 Pro Tips for All Hot Water Systems:
- Always turn off power and disconnect propane before performing any work.
- Regular annual flushing and anode rod inspection will prevent most issues.
- If troubleshooting electrical components, use a multimeter and follow safety precautions.
Final Thoughts
Understanding your RV’s hot water system and keeping it well-maintained ensures you’ll enjoy reliable hot water on every adventure. Whether you stick with a traditional tank or upgrade to a tankless model, regular care will maximize performance and lifespan. With a little effort, you can keep unpleasant smells and costly repairs at bay, leaving more time for the open road and fewer headaches about your HWT.
This article was written in co-operation between RV Owners Helping RV Owners (ROHRO) and DM Tech RV Education.
DIY RV repairs aren't always the answer, but the more you know, the more money you can save! 👍
Would you like more education?
- We have our💻🎓🌐 ROHRO's The RV Blueprint Online Course🧑🏫
- Different 📚Offline Resources📚 you can order for all types of RVers
- We also offer our free 📖RV Life Mastery Guides📖
We have something for all types of RVer's!
Visit us at🧑🤝🧑 The Official ROHRO Website ❓or just click the 🏠homepage in the menu up top!